> For the complete documentation index, see [llms.txt](https://sensorbeeab.gitbook.io/sensorbeeab-docs/llms.txt). Markdown versions of documentation pages are available by appending `.md` to page URLs; this page is available as [Markdown](https://sensorbeeab.gitbook.io/sensorbeeab-docs/readme/sensorbee-air-product-manual/sensorbee-air-pairing-process/external.md).

# External

This section describes the process and parameters needed when bootstrapping a device to an external LwM2M server.

#### Scanning the QR Code <a href="#b66cc33d283641889e0ebb214816958f" id="b66cc33d283641889e0ebb214816958f"></a>

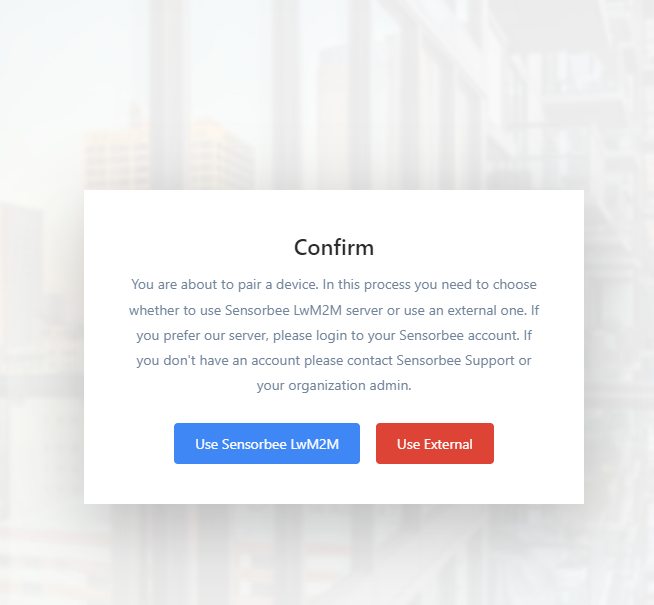
When you scan the QR code from the sticker attached in your device, you will be redirected to this url: [https://console.sensorbee.com/setup/](https://console.sensorbee.com/setup/aol30di)\<peeringcode>Step 1: If you are NOT logged-in, you will be prompted with this message:

<figure><img src="https://image-forwarder.notaku.so/aHR0cHM6Ly93d3cubm90aW9uLnNvL2ltYWdlL2h0dHBzJTNBJTJGJTJGczMtdXMtd2VzdC0yLmFtYXpvbmF3cy5jb20lMkZzZWN1cmUubm90aW9uLXN0YXRpYy5jb20lMkY3MzZkYWViNS05MWEyLTQzNGItODUyMS0yYmUxNTc0ODgyM2YlMkZVbnRpdGxlZC5wbmc_dGFibGU9YmxvY2smc3BhY2VJZD04YTlhZWQwNi1mODQ0LTRkZTQtYjk2Yi1jMTUyNjkzMWM1NTcmaWQ9MmM5NmNkNTEtNjJhMS00NTc2LWFmNTMtMjUwZGY0MGE5M2IwJmNhY2hlPXYyJndpZHRoPTExMDEuOTc0OTc1NTg1OTM3NQ==" alt="Image without caption"><figcaption></figcaption></figure>

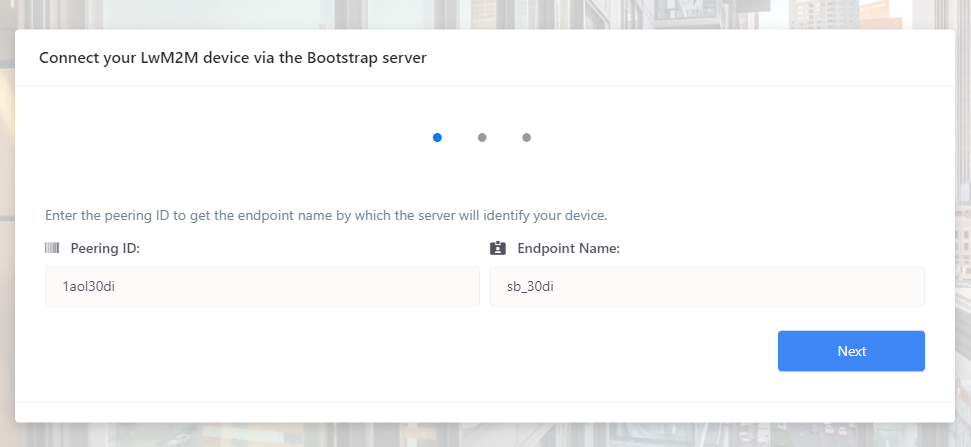
Step 2: Since this section talks about external, you will select “Use External”. This differs from the type “internal” because this won’t require any user authentication. Then you will be redirected to this view, wherein all fields are already prefilled for you.

<figure><img src="https://image-forwarder.notaku.so/aHR0cHM6Ly93d3cubm90aW9uLnNvL2ltYWdlL2h0dHBzJTNBJTJGJTJGczMtdXMtd2VzdC0yLmFtYXpvbmF3cy5jb20lMkZzZWN1cmUubm90aW9uLXN0YXRpYy5jb20lMkY4MDFhYmIzMS1iZDUyLTQ4ZWItOTQ4ZS02MWExMjFlOWFkOWQlMkZVbnRpdGxlZC5wbmc_dGFibGU9YmxvY2smc3BhY2VJZD04YTlhZWQwNi1mODQ0LTRkZTQtYjk2Yi1jMTUyNjkzMWM1NTcmaWQ9ZTlhMjUwYzQtODc5Mi00MjE5LTg5YTQtMTA0NWY1MWY1YTEwJmNhY2hlPXYyJndpZHRoPTExMDQuNzU=" alt="Image without caption"><figcaption></figcaption></figure>

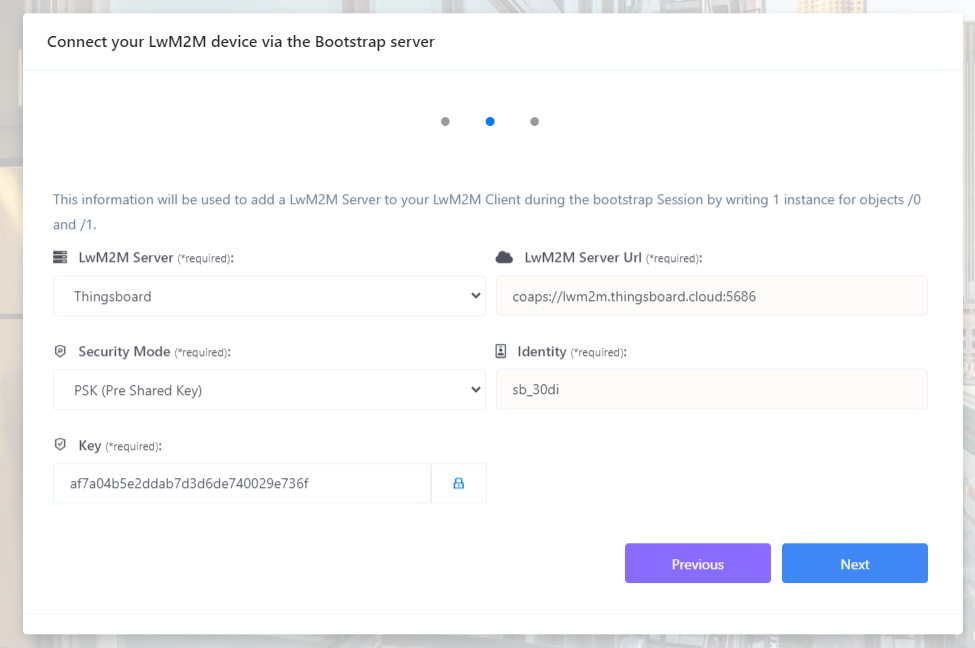
Step 3: In this step, you will be shown with the LwM2M server details such as the server url, security mode and Pre-shared key. But since you will be using external LwM2M, you have the option to change these parameters.

<figure><img src="https://image-forwarder.notaku.so/aHR0cHM6Ly93d3cubm90aW9uLnNvL2ltYWdlL2h0dHBzJTNBJTJGJTJGczMtdXMtd2VzdC0yLmFtYXpvbmF3cy5jb20lMkZzZWN1cmUubm90aW9uLXN0YXRpYy5jb20lMkYxY2YyODBiMy00YTBmLTRjYzEtYjk5ZC1jMWFhMTQ4OGU0OTIlMkZVbnRpdGxlZC5wbmc_dGFibGU9YmxvY2smc3BhY2VJZD04YTlhZWQwNi1mODQ0LTRkZTQtYjk2Yi1jMTUyNjkzMWM1NTcmaWQ9NTg3NmUzMTgtOTg1Ny00MWQ1LWIzYzQtMTc0Mjk4MDlkNmI0JmNhY2hlPXYyJndpZHRoPTExMDQuNzU=" alt="Image without caption"><figcaption></figcaption></figure>

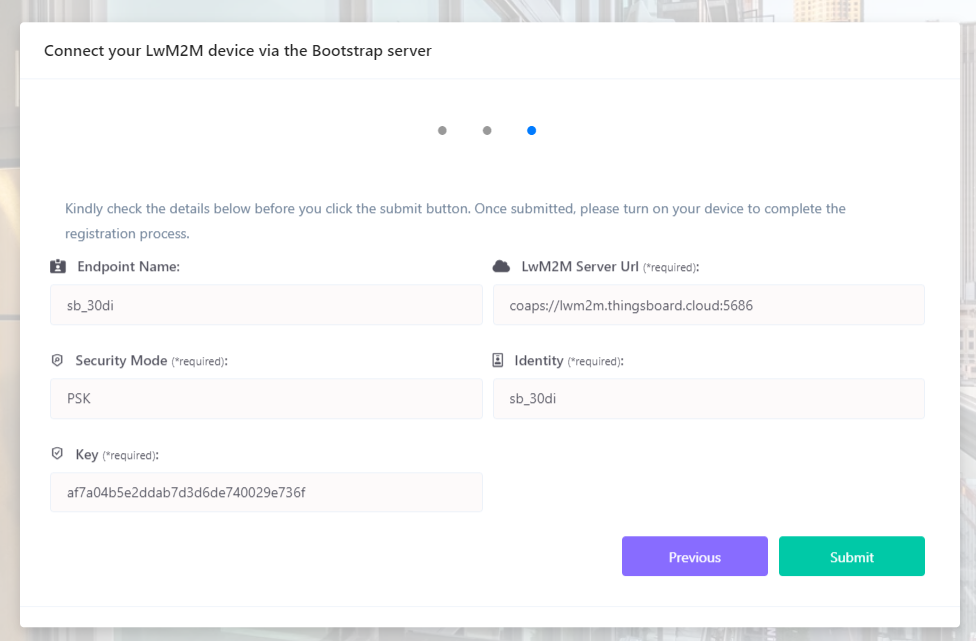
We have listed a couple of available LwM2M servers for you like Thingsboard and AvSystem. When you select either one of these, the LwM2M server URL will be prefilled for you. Otherwise, you have the option to select “others” which would allow you to enter the URL yourself.Step 4: This step is for the summary of details. You may review the details before you click submit.

<figure><img src="https://image-forwarder.notaku.so/aHR0cHM6Ly93d3cubm90aW9uLnNvL2ltYWdlL2h0dHBzJTNBJTJGJTJGczMtdXMtd2VzdC0yLmFtYXpvbmF3cy5jb20lMkZzZWN1cmUubm90aW9uLXN0YXRpYy5jb20lMkY4OTQ2YmZmYi0xZTIwLTRiODgtOTIzNy01YmJiZTFkMTI4MjMlMkZVbnRpdGxlZC5wbmc_dGFibGU9YmxvY2smc3BhY2VJZD04YTlhZWQwNi1mODQ0LTRkZTQtYjk2Yi1jMTUyNjkzMWM1NTcmaWQ9MjllZTZiNzMtOGQ4ZC00NzEyLTg5MTUtODViMTY3NWM3N2I4JmNhY2hlPXYyJndpZHRoPTExMDQuNzc1MDI0NDE0MDYyNQ==" alt="Image without caption"><figcaption></figcaption></figure>

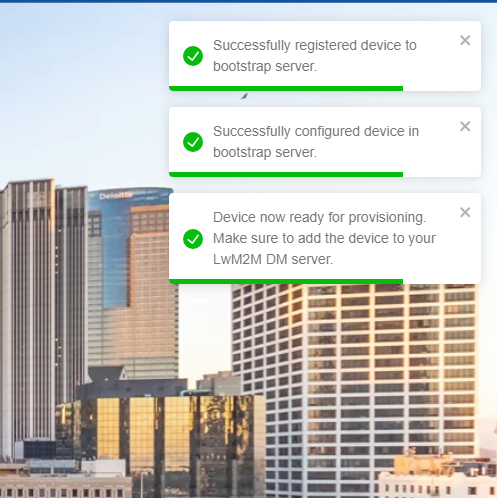
Step 5: After clicking submit, your device will be registered to our bootstrap server and will remain there for the next hour or until you turn it on. *(Note: This device cannot be managed or viewed from the cloud portal).*

<figure><img src="https://image-forwarder.notaku.so/aHR0cHM6Ly93d3cubm90aW9uLnNvL2ltYWdlL2h0dHBzJTNBJTJGJTJGczMtdXMtd2VzdC0yLmFtYXpvbmF3cy5jb20lMkZzZWN1cmUubm90aW9uLXN0YXRpYy5jb20lMkZhZGE4YTU4Yi03YWY2LTQ5NWUtOWFhNi0xNDEwMDkxYTg3MWMlMkZVbnRpdGxlZC5wbmc_dGFibGU9YmxvY2smc3BhY2VJZD04YTlhZWQwNi1mODQ0LTRkZTQtYjk2Yi1jMTUyNjkzMWM1NTcmaWQ9MmEwMDZhYzgtMzQzMC00OWI0LTg3ZGItZDMwYjliMWI5MGQ4JmNhY2hlPXYyJndpZHRoPTk5NA==" alt="Image without caption"><figcaption></figcaption></figure>

#### Additional Information: <a href="#fe1d1cb4f4294b0ca38a571d00a047d6" id="fe1d1cb4f4294b0ca38a571d00a047d6"></a>

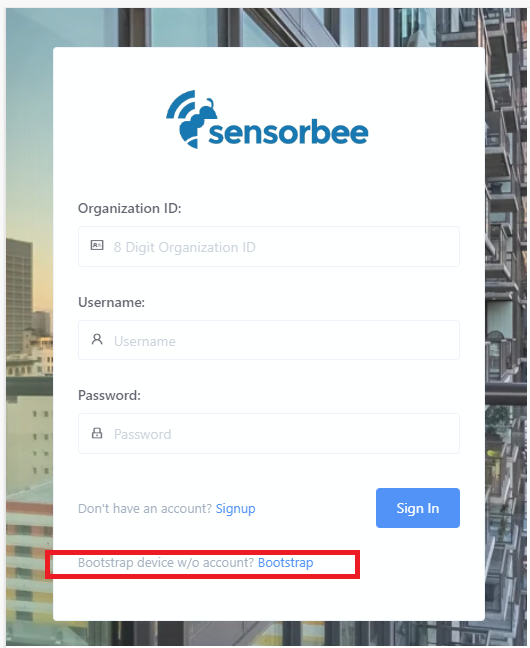
The process shown above is by scanning the QR code. However, in the cloud portal’s login page, there is an option there to bootstrap device externally without scanning. Just click the “Bootstrap” link, and you will be prompted with the bootstrap modal.

<figure><img src="https://image-forwarder.notaku.so/aHR0cHM6Ly93d3cubm90aW9uLnNvL2ltYWdlL2h0dHBzJTNBJTJGJTJGczMtdXMtd2VzdC0yLmFtYXpvbmF3cy5jb20lMkZzZWN1cmUubm90aW9uLXN0YXRpYy5jb20lMkY3MmEzZmU1MC03NTYwLTQ1OWEtODBmMC1kMThhOGNmYjgwZWIlMkZVbnRpdGxlZC5wbmc_dGFibGU9YmxvY2smc3BhY2VJZD04YTlhZWQwNi1mODQ0LTRkZTQtYjk2Yi1jMTUyNjkzMWM1NTcmaWQ9ODk1YWE4ZjgtNTQ4Zi00Zjk2LTg3NDQtOGRjYjkxZDg2YzczJmNhY2hlPXYyJndpZHRoPTEwNjA=" alt="Image without caption"><figcaption></figcaption></figure>

\\

\\