> For the complete documentation index, see [llms.txt](https://sensorbeeab.gitbook.io/sensorbeeab-docs/llms.txt). Markdown versions of documentation pages are available by appending `.md` to page URLs; this page is available as [Markdown](https://sensorbeeab.gitbook.io/sensorbeeab-docs/readme/sensorbee-air-product-manual/sensorbee-air-lite/quick-start-guide/8.-battery.md).

# 8. Battery

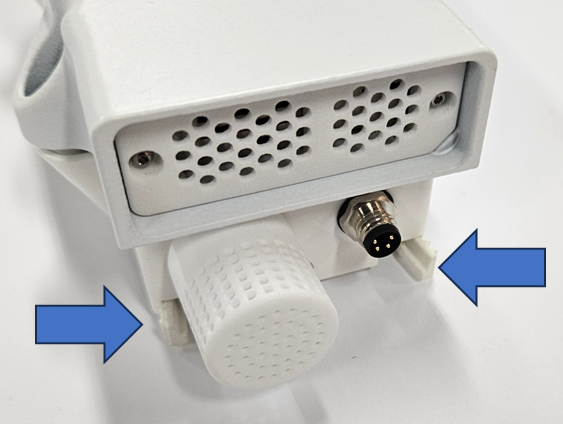
To remove the unit, first disconnect any connected cables, and then press the two tabs inward. Next, lift the unit off the mounting bracket as shown in figure 1.

<figure><img src="https://image-forwarder.notaku.so/aHR0cHM6Ly93d3cubm90aW9uLnNvL2ltYWdlL2h0dHBzJTNBJTJGJTJGczMtdXMtd2VzdC0yLmFtYXpvbmF3cy5jb20lMkZzZWN1cmUubm90aW9uLXN0YXRpYy5jb20lMkYzY2YxODg2Yy02Njg2LTQ5OGMtYTMyMS1hZjU5ODA4NmM1MWYlMkZVbnRpdGxlZC5wbmc_dGFibGU9YmxvY2smc3BhY2VJZD04YTlhZWQwNi1mODQ0LTRkZTQtYjk2Yi1jMTUyNjkzMWM1NTcmaWQ9MjcwZjQ0YTctNDBiZi00YWNhLTkwMzEtNGUxNWJkNDkzODgxJmNhY2hlPXYyJndpZHRoPTY3Mg==" alt="Figure 1."><figcaption><p>Figure 1.</p></figcaption></figure>

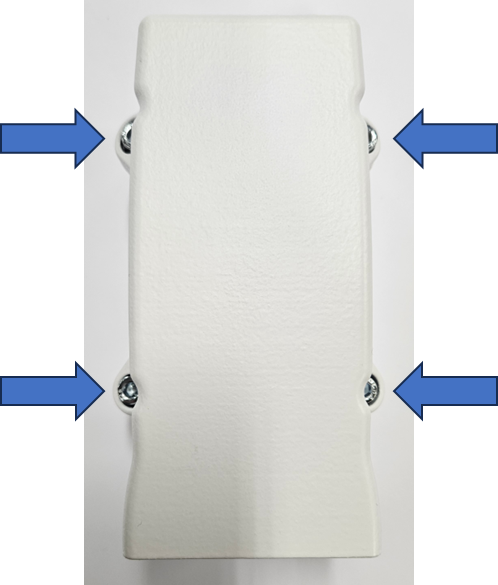
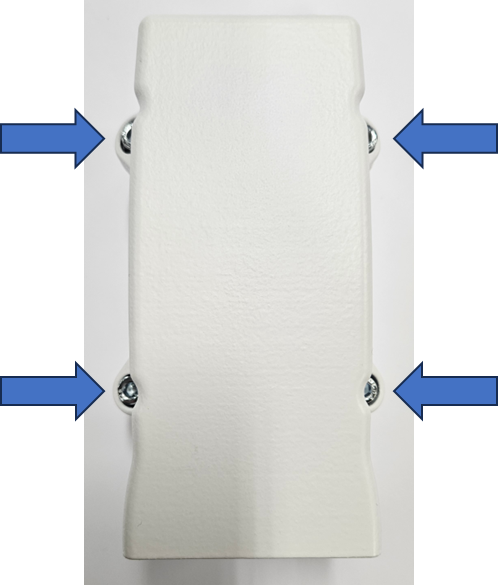
Use an PH2 Phillips screwdriver to unscrew the sensor-house from the base as shown in figure 2.

<figure><img src="https://image-forwarder.notaku.so/aHR0cHM6Ly93d3cubm90aW9uLnNvL2ltYWdlL2h0dHBzJTNBJTJGJTJGczMtdXMtd2VzdC0yLmFtYXpvbmF3cy5jb20lMkZzZWN1cmUubm90aW9uLXN0YXRpYy5jb20lMkYxYmEwNmIwOS1kOGY1LTRlZjItOTlhYi1lNDBjNmU1ZGQzZmUlMkZVbnRpdGxlZC5wbmc_dGFibGU9YmxvY2smc3BhY2VJZD04YTlhZWQwNi1mODQ0LTRkZTQtYjk2Yi1jMTUyNjkzMWM1NTcmaWQ9ZWIzMzQ1NTctMDk1MS00OGNmLWFjN2MtZWZlYThiZDVmNGI3JmNhY2hlPXYyJndpZHRoPTU3Ng==" alt="Figure 2."><figcaption><p>Figure 2.</p></figcaption></figure>

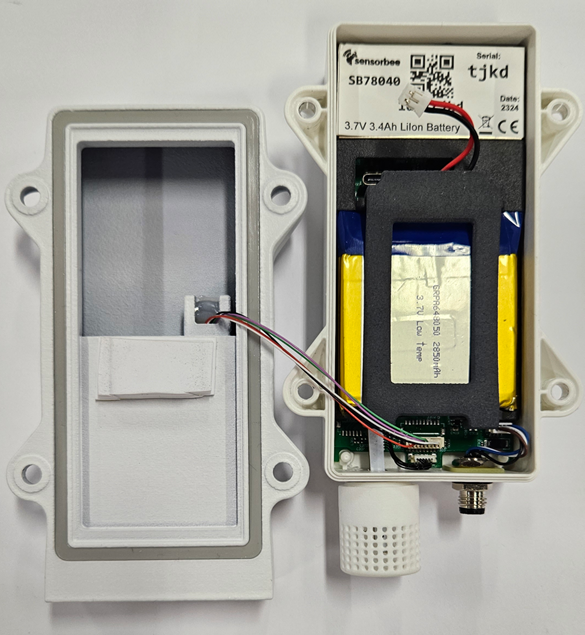
Place the sensor-house upside down next to the base, without disconnecting the cable between them as shown in figure 3.

<figure><img src="https://image-forwarder.notaku.so/aHR0cHM6Ly93d3cubm90aW9uLnNvL2ltYWdlL2h0dHBzJTNBJTJGJTJGczMtdXMtd2VzdC0yLmFtYXpvbmF3cy5jb20lMkZzZWN1cmUubm90aW9uLXN0YXRpYy5jb20lMkY5MjEzNGEyMS1mZmRiLTQyZTQtYTM5OC1kY2Y0MGRkYmQ4ZWIlMkZVbnRpdGxlZC5wbmc_dGFibGU9YmxvY2smc3BhY2VJZD04YTlhZWQwNi1mODQ0LTRkZTQtYjk2Yi1jMTUyNjkzMWM1NTcmaWQ9YWU0MTQ5NmMtZjVmOC00YTFlLTk3MWEtNjQyNzU3OGRhYWQyJmNhY2hlPXYyJndpZHRoPTc2OA==" alt="Figure 3."><figcaption><p>Figure 3.</p></figcaption></figure>

<mark style="background-color:green;">ℹ️If your Sensorbee Air Lite model does not contain batteries, proceed directly to chapter 4.3.</mark>

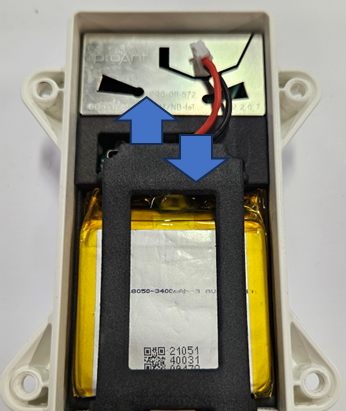
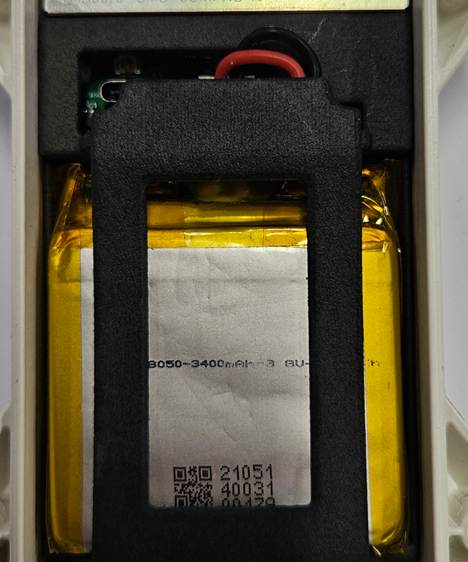
You must first remove the battery clip. This can be done by gently pressing down on the clip and twisting the edge upwards, as shown in figure 4.

<figure><img src="https://image-forwarder.notaku.so/aHR0cHM6Ly93d3cubm90aW9uLnNvL2ltYWdlL2h0dHBzJTNBJTJGJTJGczMtdXMtd2VzdC0yLmFtYXpvbmF3cy5jb20lMkZzZWN1cmUubm90aW9uLXN0YXRpYy5jb20lMkY4YWY0Njg1MS00Y2JmLTRiYzktYTJkOC1iNmNmYWRmZDcwZGUlMkZVbnRpdGxlZC5wbmc_dGFibGU9YmxvY2smc3BhY2VJZD04YTlhZWQwNi1mODQ0LTRkZTQtYjk2Yi1jMTUyNjkzMWM1NTcmaWQ9NDcyNWZlNzctZTZiZC00YzlkLWEyZWYtZWJiOThiZGRjNTA0JmNhY2hlPXYyJndpZHRoPTY5Mg==" alt="Figure 4."><figcaption><p>Figure 4.</p></figcaption></figure>

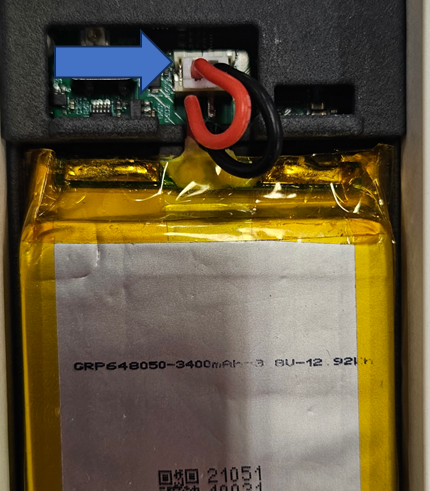
To connect the battery, insert the battery connector into the 2-pin connector located on the main board. Refer to figure 5 for illustration and put back the battery clip according to figure 6.

<mark style="background-color:green;">⚠️The red (positive) cable should be on the left side, closest to the USB-C connector. Do not connect the cables in any other direction, as this will cause permanent damage to the unit.</mark>

<figure><img src="https://image-forwarder.notaku.so/aHR0cHM6Ly93d3cubm90aW9uLnNvL2ltYWdlL2h0dHBzJTNBJTJGJTJGczMtdXMtd2VzdC0yLmFtYXpvbmF3cy5jb20lMkZzZWN1cmUubm90aW9uLXN0YXRpYy5jb20lMkY1OGZhY2ZiMi1mMzcyLTRjYzEtOWIxNC1iMTE0YzMzZTRlNzIlMkZVbnRpdGxlZC5wbmc_dGFibGU9YmxvY2smc3BhY2VJZD04YTlhZWQwNi1mODQ0LTRkZTQtYjk2Yi1jMTUyNjkzMWM1NTcmaWQ9OGEyYmIwODgtODQzYy00N2RkLWExZDItYmI1ZmNkMzVmNDkxJmNhY2hlPXYyJndpZHRoPTU3Ng==" alt="Figure 5."><figcaption><p>Figure 5.</p></figcaption></figure>

<figure><img src="https://image-forwarder.notaku.so/aHR0cHM6Ly93d3cubm90aW9uLnNvL2ltYWdlL2h0dHBzJTNBJTJGJTJGczMtdXMtd2VzdC0yLmFtYXpvbmF3cy5jb20lMkZzZWN1cmUubm90aW9uLXN0YXRpYy5jb20lMkYwOGVmNzliNi0yMjU1LTQxNDItYjMxOC03ZjY3YzMzMjRhZjclMkZVbnRpdGxlZC5wbmc_dGFibGU9YmxvY2smc3BhY2VJZD04YTlhZWQwNi1mODQ0LTRkZTQtYjk2Yi1jMTUyNjkzMWM1NTcmaWQ9OTExNTY3ZWItMTk5Ni00NzFiLWEwZmEtYjgyMGUxYTVkNmU0JmNhY2hlPXYyJndpZHRoPTU3Ng==" alt="Figure 6."><figcaption><p>Figure 6.</p></figcaption></figure>

The unit will now operate on its internal battery. The status LED indicates booting and network status.

<mark style="background-color:green;">ℹ️If the status LED is not lit or blinking, even for a short time, please double-check the battery connection to the main board. Alternatively, try using an external power supply.</mark>

Use an PH2 Phillips screwdriver to screw the sensor-house back the base as shown in figure 7.

<mark style="background-color:green;">✅Double check that the cable between the sensor-house and base does not get squeezed in the seal between them.</mark>

<figure><img src="https://image-forwarder.notaku.so/aHR0cHM6Ly93d3cubm90aW9uLnNvL2ltYWdlL2h0dHBzJTNBJTJGJTJGczMtdXMtd2VzdC0yLmFtYXpvbmF3cy5jb20lMkZzZWN1cmUubm90aW9uLXN0YXRpYy5jb20lMkYxYmEwNmIwOS1kOGY1LTRlZjItOTlhYi1lNDBjNmU1ZGQzZmUlMkZVbnRpdGxlZC5wbmc_dGFibGU9YmxvY2smc3BhY2VJZD04YTlhZWQwNi1mODQ0LTRkZTQtYjk2Yi1jMTUyNjkzMWM1NTcmaWQ9YzYwYzc1MDEtZmFmYS00MGQxLThlMTYtMjBjOTNjNTc5NGU2JmNhY2hlPXYyJndpZHRoPTU3Ng==" alt="Figure 7."><figcaption><p>Figure 7.</p></figcaption></figure>

\\